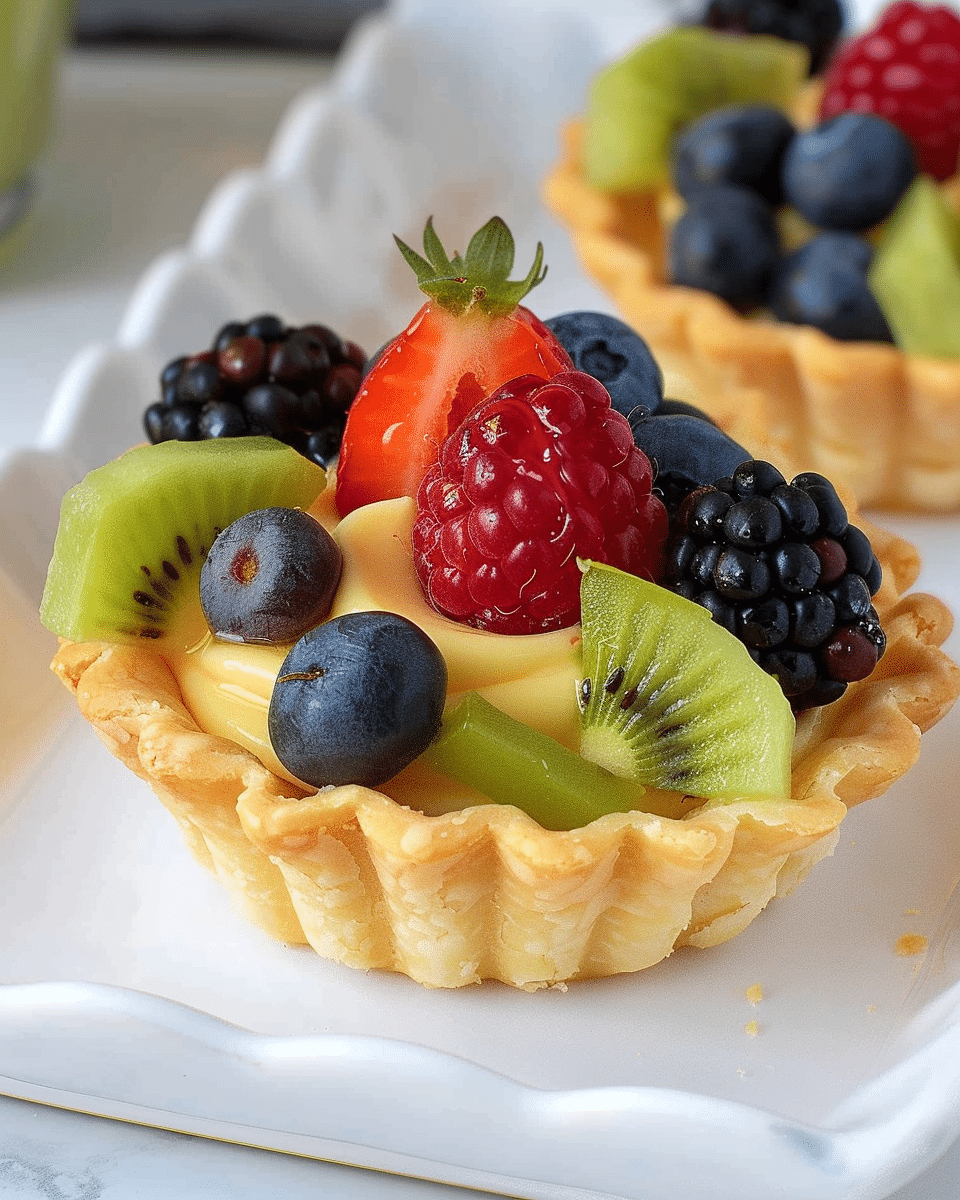
Crisp, buttery tartlet shells filled with silky Italian pastry cream and topped with vibrant, fresh fruits—these mini fruit tarts are elegant, colorful, and perfect for any celebration.
Why You'll Love This Recipe
These mini fruit tarts combine the perfect balance of textures and flavors in one elegant package. The buttery, crisp pastry shells provide a wonderful contrast to the smooth, vanilla-infused pastry cream, while the fresh fruits add a burst of color and natural sweetness. They're impressive enough for special occasions yet simple enough to make for weekend treats. These individual-sized desserts are not only beautiful to look at but also convenient to serve, eliminating the need for slicing. The combination of the rich pastry cream with seasonal fruits creates a light, refreshing dessert that's perfect year-round.
Ingredients
(Tip: You'll find the full list of ingredients and measurements in the recipe card below.)
Whole milk provides the creamy base for the pastry cream, giving it a rich texture and flavor that can't be achieved with lower-fat alternatives. For the best results, avoid substituting with skim or non-dairy milk.
Lemon rind adds a subtle citrus note to the pastry cream without overpowering it. This bright flavor helps balance the richness of the cream and complements the fresh fruit toppings.
Egg yolks enrich the pastry cream, providing that classic custard texture and golden color. They act as a natural thickener and contribute to the silky mouthfeel of the filling.
Granulated sugar sweetens both the pastry cream and the tart shell with just the right amount of sweetness. It dissolves easily into the mixture, ensuring a smooth texture.
All-purpose flour serves as the structure-builder in both the crust and the pastry cream. In the cream, it works as a thickening agent, while in the crust, it creates that perfect tender-crisp base.
Vanilla extract adds warmth and depth to the pastry cream. Use pure vanilla extract rather than imitation for the best flavor profile.
Unsalted butter creates that melt-in-your-mouth texture in the tartlet crusts. Make sure it's at room temperature to properly cream with the sugar for a light, tender crust.
Lemon zest brightens the flavor of the tart shells, adding a subtle citrus note that complements the fruit toppings beautifully.
Apricot jam forms the base of the fruit glaze, adding shine and a touch of sweetness while protecting the fruit from drying out. Its mild flavor doesn't compete with the fresh fruits.
Fresh fruits including blueberries, raspberries, and kiwi provide vibrant color, natural sweetness, and fresh flavor. You can substitute with seasonal fruits of your choice for variety.
Directions
- Make the Italian Pastry Cream:
- Heat the milk and a strip of lemon zest in a medium saucepan over medium heat until steaming but not boiling. Remove from heat.
- In a bowl, whisk the egg yolks, sugar, and flour until smooth. Slowly whisk the hot milk into the egg mixture. Stir in the vanilla extract.
- Pour the mixture back into the saucepan over medium heat. Whisk constantly until it thickens and comes to a boil. Simmer for 1 minute to cook the flour.
- Pour the pastry cream into a bowl, cover with plastic wrap pressed onto the surface, and cool for 10-15 minutes. Chill in the refrigerator until cold.
- Make the Tartlet Crust:
- Beat the butter with an electric mixer until creamy. Add sugar and lemon zest, and beat until combined.
- Lightly beat the egg, then gradually add it, mixing well after each addition.
- Use a wooden spoon to work in the flour and salt until combined. Knead lightly on a floured surface until smooth. Wrap in plastic and chill for 30 minutes.
- Spray the mini tart pans with non-stick spray. Roll out half the dough between parchment paper to ¼ inch (5 mm) thickness. Cut circles to fit the tart pans.
- Press the dough into the pans, trim edges, and prick the base with a fork. Freeze for 30 minutes.
- Preheat the oven to 350ºF (180ºC). Bake for 12-14 minutes, until golden around the edges. Cool the tart shells on a wire rack.
- Make the Glaze:
- Heat the apricot jam in the microwave until liquid. Pass through a fine mesh strainer to remove any solids. Thin with water if needed for a brushable consistency.
- Assemble the Tarts:
- Spoon the chilled Italian pastry cream into the cooled tartlet shells and spread evenly.
- Arrange the blueberries, raspberries, and kiwi slices on top of the pastry cream, pressing gently into place.
- Lightly brush the fruit with the apricot glaze for a shiny finish.
- Refrigerate the tarts until ready to serve.
Servings and Timing
This recipe makes 16 mini fruit tarts, each containing approximately 190 calories. The preparation time is about 1 hour, with a cooking time of 30 minutes. Additional chilling time of about 1 hour is needed, bringing the total time to approximately 2 hours and 30 minutes. These tarts are perfect for serving at brunch, afternoon tea, or as an elegant dessert after dinner. They're ideal for special occasions like birthdays, baby showers, or holiday gatherings where individual servings are appreciated.
Variations
Chocolate Pastry Cream: Add 2 ounces of chopped dark chocolate to the hot pastry cream and stir until melted for a chocolate variation.
Seasonal Fruit Tarts: Adapt the fruit toppings based on what's in season - try strawberries and peaches in summer, or poached pears and cranberries in winter.
Nut Crust: Add ¼ cup of finely chopped almonds or hazelnuts to the tart dough for a nutty flavor and texture.
Coconut Cream Tarts: Replace ½ cup of the milk with coconut milk in the pastry cream and top with tropical fruits like mango and pineapple.
Lemon Curd Variation: Replace the pastry cream with lemon curd for a tangier filling that pairs beautifully with berries.
Miniature Versions: Use a mini muffin tin to make bite-sized tarts for parties or cocktail events.
Cinnamon Spiced Shells: Add ½ teaspoon of cinnamon to the tart dough for a warming spice note, perfect for fall fruit combinations.
Storage/Reheating
These mini fruit tarts are best enjoyed within 24 hours of assembly, as the fruit can release moisture and soften the crust over time. Store assembled tarts in the refrigerator, loosely covered, for up to 2 days.
For longer storage, you can prepare the components separately: the baked tart shells can be stored at room temperature in an airtight container for up to 3 days, or frozen for up to a month. The pastry cream can be refrigerated for up to 3 days with plastic wrap pressed directly on the surface to prevent a skin from forming.
These tarts are meant to be served cold and don't require reheating. If you've stored the tart shells in the freezer, simply thaw them at room temperature before filling.
For the best presentation, consider assembling the tarts shortly before serving, especially if you're preparing them for a special occasion. This ensures the crust remains crisp and the fruits look their freshest.

FAQs
Why did my pastry cream turn lumpy?
Lumpy pastry cream typically results from cooking it too quickly or not whisking constantly. To prevent this, whisk continuously while cooking, and make sure to gradually incorporate the hot milk into the egg mixture to temper the eggs. If you do end up with lumps, strain the pastry cream through a fine-mesh sieve while it's still hot.
Can I make these tarts ahead of time?
Yes, but with some planning. You can prepare the tart shells and pastry cream up to 2 days in advance and store them separately. Assemble the tarts with the fruit within a few hours of serving for the best texture and appearance.
What's the best way to remove the tarts from their pans?
Make sure to properly grease the pans before adding the dough. After baking and cooling for about 10 minutes, gently loosen the edges with a small knife if needed, then carefully push up from the bottom or invert onto your hand to release the tart shells.
Can I use store-bought tart shells to save time?
Absolutely! Pre-baked mini tart shells work well as a time-saving alternative. Just be sure they're fully baked before filling them with the pastry cream.
My tart dough keeps breaking when I roll it out. What am I doing wrong?
If your dough is too crumbly, it might be too cold or too dry. Let it sit at room temperature for 5-10 minutes before rolling. You can also try adding a teaspoon of cold water if it seems too dry. Roll between parchment paper for easier handling.
Can I substitute the fresh fruits with other options?
Definitely! Use any fruits that are in season and that you enjoy. Strawberries, blackberries, sliced peaches, mandarin segments, and grapes all work beautifully. Just make sure they're not too wet, as excess moisture can make the tarts soggy.
Why is it important to press plastic wrap onto the surface of the pastry cream?
This prevents a skin from forming on the surface of the pastry cream as it cools. The plastic wrap should be in direct contact with the cream to create a barrier against air.
Can I make these tarts gluten-free?
Yes, you can substitute the all-purpose flour with a good quality gluten-free flour blend in both the crust and pastry cream. Look for one that contains xanthan gum for the best texture results.
The edges of my tart shells shrunk during baking. How can I prevent this?
Shrinkage often occurs when the dough is stretched during placement or when it's not properly chilled. Make sure to gently press the dough into the corners without stretching it, and don't skip the freezing step before baking.
Can I use a different glaze for the fruit topping?
Certainly! While apricot jam provides a classic, neutral shine, you can also use currant jelly for a redder tint or even a simple syrup infused with a complementary flavor like lemon or vanilla. Just warm it until fluid, strain if necessary, and brush lightly over the fruit.
Conclusion
These Mini Fruit Tarts represent the perfect balance of elegance and accessibility in home baking. With their buttery crusts, silky Italian pastry cream, and vibrant fresh fruit toppings, they're bound to impress at any gathering. While they may seem intricate, breaking down the process into manageable steps makes these professional-looking desserts achievable for home bakers of all skill levels.
The beauty of these tarts lies in their versatility – they can be adapted to any season by changing the fruit toppings, and the components can be prepared ahead of time for convenient assembly. Whether you're hosting a sophisticated afternoon tea, looking for a light yet impressive dinner party dessert, or simply want to brighten someone's day with a special treat, these mini fruit tarts deliver both visual appeal and delicious flavor.
Master this recipe, and you'll have a timeless classic in your repertoire that never fails to delight. The combination of textures and flavors – from crisp pastry to smooth cream to juicy fruit – creates a dessert experience that feels much greater than the sum of its parts.

Mini Fruit Tarts
- Total Time: 2 hours 30 minutes
- Yield: 16 tartlets
- Diet: Vegetarian
Description
Crisp, buttery tartlet shells filled with silky Italian pastry cream and topped with vibrant, fresh fruits—these mini fruit tarts are elegant, colorful, and perfect for any celebration.
Ingredients
- 1 ½ cups (354 ml) whole milk
- 1 strip lemon rind
- 3 egg yolks
- ⅓ cup (66 g) granulated sugar
- ¼ cup (30 g) all-purpose flour
- 1 teaspoon vanilla extract
- 4 ounces (120 g) unsalted butter, room temperature
- ⅓ cup (66 g) granulated sugar
- 1 teaspoon finely grated lemon zest
- 1 large egg, room temperature
- 2 cups (250 g) all-purpose flour
- Pinch of salt
- 1 tablespoon apricot jam or conserve
- Water as needed
- 4 oz (115 g) blueberries
- 4 oz (115 g) raspberries
- 2 kiwi fruits
Instructions
- Heat the milk and a strip of lemon zest in a medium saucepan over medium heat until steaming but not boiling. Remove from heat.
- In a bowl, whisk the egg yolks, sugar, and flour until smooth. Slowly whisk the hot milk into the egg mixture. Stir in the vanilla extract.
- Pour the mixture back into the saucepan over medium heat. Whisk constantly until it thickens and comes to a boil. Simmer for 1 minute to cook the flour.
- Pour the pastry cream into a bowl, cover with plastic wrap pressed onto the surface, and cool for 10-15 minutes. Chill in the refrigerator until cold.
- Beat the butter with an electric mixer until creamy. Add sugar and lemon zest, and beat until combined.
- Lightly beat the egg, then gradually add it, mixing well after each addition.
- Use a wooden spoon to work in the flour and salt until combined. Knead lightly on a floured surface until smooth. Wrap in plastic and chill for 30 minutes.
- Spray the mini tart pans with non-stick spray. Roll out half the dough between parchment paper to ¼ inch (5 mm) thickness. Cut circles to fit the tart pans.
- Press the dough into the pans, trim edges, and prick the base with a fork. Freeze for 30 minutes.
- Preheat the oven to 350ºF (180ºC). Bake for 12-14 minutes, until golden around the edges. Cool the tart shells on a wire rack.
- Heat the apricot jam in the microwave until liquid. Pass through a fine mesh strainer to remove any solids. Thin with water if needed for a brushable consistency.
- Spoon the chilled Italian pastry cream into the cooled tartlet shells and spread evenly.
- Arrange the blueberries, raspberries, and kiwi slices on top of the pastry cream, pressing gently into place.
- Lightly brush the fruit with the apricot glaze for a shiny finish.
- Refrigerate the tarts until ready to serve.
Notes
- The dough needs to chill for at least 30 minutes before rolling out.
- The tart shells can be baked ahead of time and stored for up to 2 days in an airtight container.
- Be sure to assemble the tarts just before serving for the freshest appearance.
- You can substitute other fresh fruits as preferred.
- Prep Time: 1 hour
- Cook Time: 30 minutes
- Category: Dessert
- Method: Baking
- Cuisine: French
Nutrition
- Serving Size: 1 tartlet
- Calories: 190 kcal
- Sugar: 12 g
- Sodium: 25 mg
- Fat: 9 g
- Saturated Fat: 5 g
- Unsaturated Fat: 4 g
- Trans Fat: 0 g
- Carbohydrates: 24 g
- Fiber: 1 g
- Protein: 3 g
- Cholesterol: 36 mg

